Summary
This blog post describes how you would deploy files to a Windows Server via SFTP using Gitlab pipelines using shared runners.
The practical uptake for this is that you can deploy files for your website to be served by Internet Information Services (IIS) server using Gitlab pipelines.
Note: The context of this post is about deploying websites but the steps described can be used for deploying any type of file using Gitlab pipelines.
Contents
- Assumptions
- What are Gitlab pipelines
- How Gitlab pipelines work
- Sample .gitlab-ci.yml
Assumptions
- You have an working Gitlab account.
- You have a working Gitlab repository.
- You have a Windows Server
- You have a SFTP server running on your Windows Server and you have a working SFTP account for that server.
If you do not have a SFTP server, you can consider SFTP/SCP Server from SolarWinds.
Its not a fantastic product but it would have to do (considering that it is a free product)
The software is available at the following url after registration:
http://www.solarwinds.com/free-tools/free-sftp-server/registration
What are Gitlab pipelines
To put it simply, pipelines is Gitlab’s mechanism to perform tasks specified by you when you check-in files into your Gitlab repository. These tasks are executed by processes (dubbed "runners" in Gitlab terminology).
The runners can be grouped in shared and private (non-shared) runners.
Shared runners are hosted by Gitlab to be used by all users of Gitlab that wishes to use them). They are free to use but are limited to 2000 CI minutes per month unless you upgrade your Gitlab plan.
In comparison, private runners are setup using your own resources. After you setup your private runner, you have to register it to Gitlab in order to have Gitlab to use it.
How Gitlab pipelines work
When you check in files into your Gitlab repository, Gitlab will check for the existence of a file called ".gitlab-cl.yml". This file must be named exactly as typed (it is case-sensitive). The existence of this file tells Gitlab that there are tasks to be done. This file will list out the "jobs" for Gitlab to carry out.
Side note: As can be guessed from the file extension ".yml", this is a YAML (YAML Ain’t Markup Language) file. For details for the syntax of YAML, see http://www.yaml.org/
Sample .gitlab-ci.yml
As mentioned in the summary of this blog post, we want to setup a Gitlab pipeline that deploy to our SFTP server whenever we checked in a file. As such the below is the ".gitlab-ci.yml" file that would allow us to do that.
image: alpine
before_script:
– apk update
– apk add openssh sshpass lftp
deploy_pages:
stage: deploy
script:
– ls -al
– mkdir .public
– cp -r * .public
– echo "pwd" | sshpass -p $SFTP_PASSWORD sftp -o StrictHostKeyChecking=no zhixian@servername.somedomain.com
– lftp -e "mirror -R .public/ /test" -u zhixian,$SFTP_PASSWORD sftp://servername.somedomain.com
artifacts:
paths:
– .public
only:
– master
The following is what what each of lines do:
Line 1: Declare that "jobs" will be executed in a Docker container that use the image "alpine". The "alpine" image used here is one of the lightest Linux container, Alpine Linux. You can use other images as long as that image is in Docker store.
Line 3: The "before_script" section. Declare the actions to be carried before any jobs are executed in this section.
Line 4: Update the Alpine Linux software package manager, "apk". By default, "apk" is empty. So we need to populate it with the software catalog.
Line 5: Install the "openssh", "sshpass" and "lftp" software packages.
Line 7: Our declaration of a job call "deploy_pages"
Line 8: Indicate that this job is only to be execute in the "deploy" stage.
Quick concept of "stage": Basically, a job are executed in different stages in the order of "build", "test", and "deploy". Jobs in the same stage are executed concurrently (assuming there are sufficient runners to execute the jobs).
Line 9: The "script" section. Actions to be carried for the job are specify under here.
Line 10: List files in the docker container entry point. By default, Gitlab will dump a copy of your code repository at the container entry point. I like to see a list of the files. This is otherwise a frivolous step that is not need.
Lines 11 and 12: Make a directory call ".public" (note the period in front of "public") and copy all files at the entry point into this directory.
ZX: This step is for facilitating lftp at step 14. The problem is that Gitlab will dump a copy of the git repository at the entry point as well. But we don’t want to accidentally deploy the git repository, hence the copying of files to a sub-directory.
Line 13: Start a SFTP session to "servername.somedomain.com" using the account name "zhixian" using password stored in secret variable "$SFTP_PASSWORD".
Execute a SFTP command "pwd" and terminate the SFTP session.
ZX: This step seems frivolous, but is essential to the success of this job.
As mentioned, jobs are executed in a Docker container environment.
Hence, if we initiate any form of connection to a new SSH-based environment, system will prompt us to accept the "fingerprint-key" for that new SSH-based environment.
This line creates SFTP connection and accepts "fingerprint-key" for the SSH-based environment without prompts.
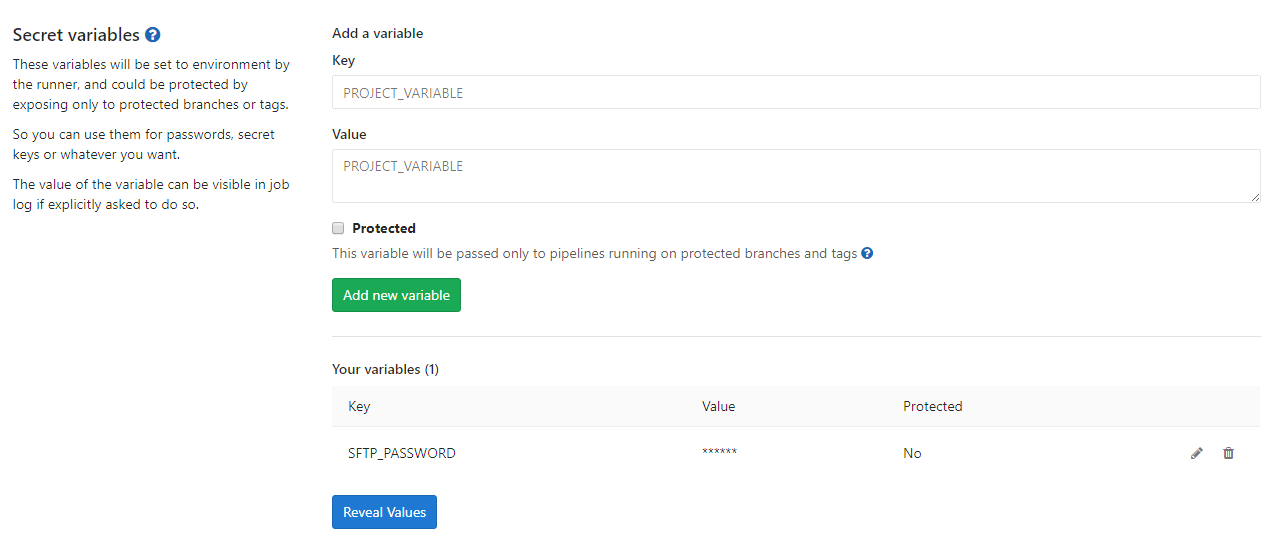
ZX: Note the "$SFTP_PASSWORD". This is a secret variable set under your Gitlab repository "Settings" section, under "Pipelines" subsection.

If you scroll down, you will see a "Secret variables" section like the below. The password to the SFTP account is specified here.
Line 14: Executes the "lftp" command. Here, we use the "mirror" feature of lftp. This feature makes a replica of the file structure of the source to the destination.
ZX: Note the "sftp://" prefix in front of the server domain name ("servername.somedomain.com"). It is important to include this to establish SFTP connectivity. If this is not specified, lftp will assume normal FTP.
Line 15: Specify the "artifacts" section. Items listed under the "artifacts" section will be available for download after the job is completed.
Line 16: Specify the "paths" section for the artifacts.
Line 17: Specify that ".public" folder is to be treated as a an artifact made available for download.
Line 18: Specify the branch of code that will cause this job would be executed.
Line 19: Specify the this job is to be executed only when someone checked-in to the "master" branch.
That’s basically all that is needed to get Gitlab to send files to your SFTP server.
References
Configuration of your jobs with .gitlab-ci.yml (https://docs.gitlab.com/ee/ci/yaml/)


