Zhixian's Tech Blog

2021-09-13

Shutter on Bodhi Linux

Filed under: Uncategorized — Tags: , , , — Zhixian @ 22:57:09 pm

This blog post is about problems encountered with using Shutter on Bodhi Linux.

A favourite screen-capturing tool that I like a lot on Linux is call Shutter.
The software package is stored inside Personal Package Archives (PPA for short) repository, so you have to install it via the following commands:

sudo add-apt-repository ppa:shutter/ppa
sudo apt install shutter

Installing the software is straight-forward.
Unfortunately the full-screen, window and tool-tip capturing functionality of the software does not work 😦

I suspect the native built-in functionality within Bodhi Linux somehow blocks these functions.
Since Bodhi Linux already has those areas covered (except of the tool-tip capture functionality), you probably won’t miss these functions (its faster to screen capture using built-in functions anyways).

The Selection screen capture function and the editing tools works though.
So that’s the value that Shutter bring in.
I really like the editing functionality and I think its a lot lighter than using Gimp.

As an aside, I also installed PowerShell Core and Visual Studio Code as part of Bodhi Linux development environment setup. Both can be installed as Debian packages. So no massive brain power needed for installing them.

Reference to Shutter PPA:
https://launchpad.net/~shutter/+archive/ubuntu/ppa

Setting Google DNS on Bodhi Linux

Filed under: Uncategorized — Tags: , , — Zhixian @ 00:21:09 am

This blog post describes the steps to set DNS on Bodhi Linux.

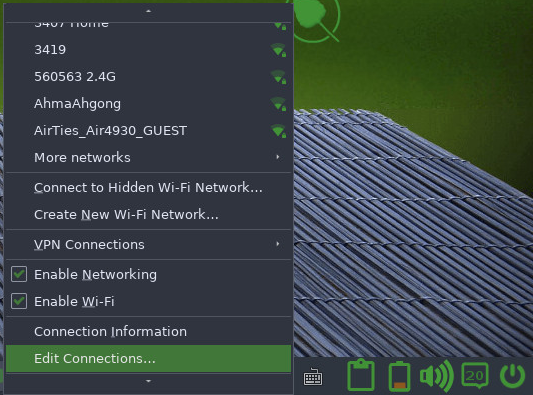
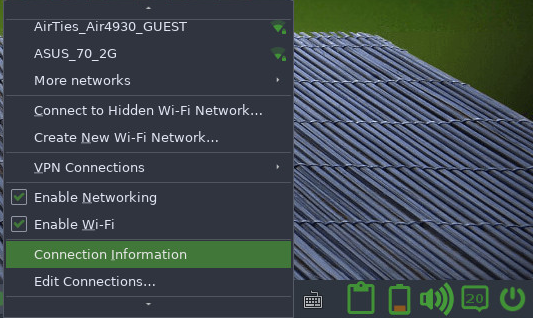
Click on the Wifi icon on the taskbar.

Wifi icon highlighted in yellow box

In the context menu, that popup, select ‘Connection Information’

After you clicked on ‘Connection Information’ menu item, it will display the Connection Information dialog which looks something like the below. We want to change the Primary DNS under IPv4 from 192.168.1.254 to Google’s DNS address which are 8.8.8.8 and 8.8.4.4

To begin setting the DNS, click on the “Edit Connections…” menu item from the Wifi context menu.

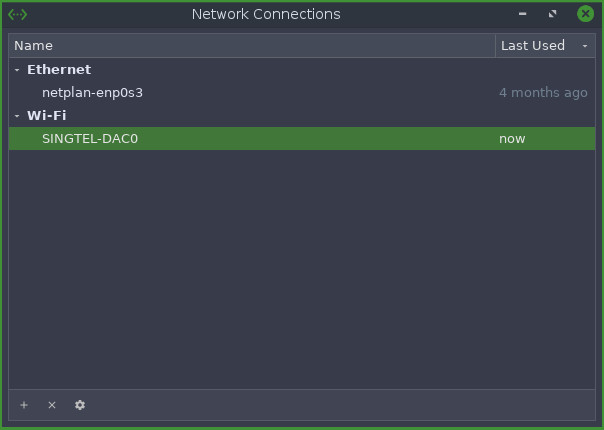
This will bring up the Network Connections dialog like the below.
Select the Wifi connection, and click on the cog icon at the bottom of the dialog.

After you click on the cog icon, another dialog for editing the network connection settings will appear.
Click on the IP4v Settings Tab.
The drop-down value for the item labeled “Method” should be “Automatic (DHCP)” by default.

Change the value of the “Method” field to “Automatice (DHCP) addresses only.
Changing the value will also change “Additional DNS Servers” field to become “DNS servers” field instead.
In the “DNS servers” field, enter “8.8.8.8, 8.8.4.4”
The resulting screen should look like the below:

Click on the “Save” button to close the dialog.

For the changes to take effect, you need to restart your Wi-Fi connection.
You can do that by unchecking and re-checking the “Enable Wi-Fi” menu-item from the Wi-Fi context menu.

After you have done that, you should see that your primary and secondary DNS is 8.8.8.8 and 8.8.4.4 respectively.

2021-09-12

Bodhi Linux setup for software development

Filed under: Uncategorized — Tags: , , , , , , , , , , , — Zhixian @ 17:24:09 pm

This blog post is about my experience setting up Bodhi Linux (BL for short hereafter) for software development for AWS using Python and AWS CDK.

Items to setup

  1. Git
  2. Python
  3. AWS CLI
  4. npm (includes nodejs)
  5. AWS CDK
  6. Configure AWS

tldr;

All the commands for a new PC setup.

git config --global user.name "Zhixian"
git config --global user.email "zhixian@hotmail.com"
sudo apt install git-gui
sudo apt install gitk

sudo apt install python-is-python3
sudo apt install python3-venv
curl "https://awscli.amazonaws.com/awscli-exe-linux-x86_64.zip" -o "awscliv2.zip"
unzip awscliv2.zip
sudo ./aws/install

sudo apt install npm
npm install -g aws-cdk

aws configure
aws s3 ls

Git

BL comes pre-installed with git.

So I just have to configure it with my name (Zhixian) and my email (zhixian@hotmail.com).

git config --global user.name "Zhixian"
git config --global user.email "zhixian@hotmail.com"

However, only the git command-line interface (CLI) tools are installed. The other commonly see graphical user interface (GUI) tools ‘git-gui’ and ‘gitk’ are not installed. Since I do use those those tools, I installed them via the following ‘apt’ command:

sudo apt install git-gui
sudo apt install gitk

Aside: Actually, the command sudo apt install git-gui is sufficient.
It would installs ‘gitk’. One of the nice side effects of installing these GUI tools is that it would also install ‘tcl’ language interpreter and the ‘tk’ graphical toolkit library that ‘tcl’ needs to create user interfaces.

Python

BL does installed with Python3. However, we commonly invoke the Python using the command ‘python’. To install the package that maps ‘python3’ to ‘python’, run the following apt commands:

sudo apt install python-is-python3

For Python development, it is common to use a virtual environment via the ‘venv’ module. However, the module installed in BL is missing another module call ‘ensurepip’. So get ‘venv’ working we need to install the ‘python-venv’ module using the following command:

sudo apt install python3-venv

AWS CLI

To install the latest version of AWS CLI tools, run the following commands:

curl "https://awscli.amazonaws.com/awscli-exe-linux-x86_64.zip" -o "awscliv2.zip"
unzip awscliv2.zip
sudo ./aws/install

npm (includes nodejs)

Installing the node package manager (npm) will also install the Nodejs interpreter.

Strictly speaking, this is not needed if you are not going to use AWS CDK.

Having said that, it is fairly common to see tools installed written in Nodejs and installed via npm (just like AWS CDK). So its probably a good idea to install it.

npm can be installed via the following command:

sudo apt install npm

AWS CDK

The AWS CDK is installed using npm command.

So you need to execute the previous step.

To install the AWS CDK, run the following command:

sudo npm install -g aws-cdk

Configure AWS

The last step is to run the configure AWS. I’m assuming you have the AWS Access ID and AWS Secret Access Key.

To configure, run the following command:

aws configure

And then finally to see if your AWS CLI is working:

aws s3 ls

If you reach this step, you would be good to go to develop stuff for AWS using Python.

2021-09-11

Linux Distribution for Yoga 330-11 : Bodhi Linux

This blog post is about my choice of Linux distribution of my Yoga 330-11igm laptop.

If you are looking to install Linux distribution to a Yoga 330-11igm,
I’m currently recommending Bodhi Linux.

In case you are wondering what’s so special about Yoga 330,
it is a actually a laptop with low resources and processing power.
Its capabilities are:

Processor: Intel Pentium Silver N5000 (Gemini Lake) processor (base speed 1.1 Ghz burstable up to 2.7 Ghz),
RAM: 4 GB of RAM
Disk space: 128 Gigabytes (eMMC Flash)
Display: 11.60 inch 16:9, 1366 x 768 pixel

You can read more about it here:
https://www.notebookcheck.net/Lenovo-Yoga-330-11IGM-Pentium-N5000-Laptop-Review.321430.0.html

After running out of disk space, I gave the machine an upgrade by adding a 240 GB M.2 SATA SSD.
I then partitioned the hard-disk such that I have:

  1. 160 GB for used with the existing Windows 10 operating system.
  2. 80 GB for used with a new Linux system that I intend to install.

So then I have to pick a Linux distribution to install.
This would not have been an issue if this PC has a better processor or tons of RAM.
But as it is, I’m trying to run a Linux system on a PC that has limited capability.
That means most of the mainstream Linux distributions would not work well with it.

So the first Linux distribution that I tried to install was Ubuntu Mate.
I have been using that with a previous Fujitsu laptop so I have decent experience with it.
The installation process was fairly smooth and nice (or at least no memorable trouble comes to mind :-D).

However after installation when I finally to interact with the desktop,
I find that its slower than from what I remember and the interface in some ways remains just as clunky.

The slower performance could be attribute to a myriad of factors.
Some of which (I’m guessing) are:

1) Newer version of Ubuntu Mate
It could be the older version of Ubuntu Mate works better than the new version of Ubuntu Mate on poorer PCs.

2) Difference in processor
The other laptop was a Pentium Core 2 Duo (which is perhaps more performant :-D)

The Fujitsu laptop also have 4 GB RAM, so I don’t think RAM was the issue.

In any case, I decide that maybe performance on Ubuntu Mate is awful and decide to try with another Linux distribution. Furthermore, another issue I had with Ubuntu Mate was with configuration of multi-langauge input method (but that could just me being dumb).

The next Linux distribution that I tried was Kali Linux.
I was thinking of having security distribution so that I can practice my white-hat hacking skills.

Kali Linux comes to mind with their tagline of “The quieter you become, the more you are able to hear”
So the thinking was that if I install Kali Linux, it will probably install a bare minimal system.
I can then work from there to find the limitations of the machine as and when I do my development stuff.

Unfortunately, the installation process ended as unsuccessful for me.
For one thing, the ISO image provided on the website seems to lack drivers that would work with the network ethernet card. And after I found the ethernet card drivers and added it to ISO, its missing another driver. 😦

Despite the missing driver, the installation process allow me to proceed to the step where I get to select software to be installed. Oddly enough, this is the step where I get blocked.
For some strange reason regardless of my selection, the installation process would declared
my selection is invalid (what?!) 😦
So I gave up and look for a another Linux distribution to try out.

As it turns out, I came across Bodhi Linux.
The installation process is fairly smooth and straightforward (which is good).
After installation when you finally get to log in, I was pleasantly surprised with how responsive the system is.

Some software that I installed right off is:

1) Google Chrome
Bodhi System comes with Chromium browser out of the box.
But for some strange reason I cannot sign into my profile.
And on the browser’s menu, it would state that the browser is managed by organisation.
So I thought “Fine!, I will download Google Chrome and install it.”
After installing Google Chrome, I have no problems syncing Google Chrome with my profile.

2) Microsoft Teams
I happened to have a Microsoft Teams with someone that afternoon.
So I download Microsoft Teams and installed it.
The video seems to work well, but the microphone does not seems to work in Teams.
The microphone is working though when I test it using the ‘arecord’ command.
I did read that there are others who seems have similar issue, so its probably a Microsoft Teams issue.
(To be fair Microsoft Teams for Linux remains in ‘preview’).

3) Firefox
This is me trying to give more love to Firefox 😀
These days, I’ll be using Microsoft Edge in office, Google Chrome on my Windows PC.
Before my Fujitsu laptop got busted, I would be using Firefox on Linux systems.

One other nice features I found out of the box in Bodhi Linux is the built-in ability to take screenshots of the full-screen or just the dialog. In other Linux distributions, I usually have to install another tool for that.
Unfortunately, to edit the pictures you have to use an image editor tool like Gimp (which is also installed out of the box). Finding a light-weight tool that can allow me to add arrows, text or highlight is on my to-do list.

I also managed to install multi-language input methods ‘fcitx’ framework.
I forgot to document this properly as it was a bit of trial-and-error.
So I could not tell exactly whats available out-of-box and what I had to do install via ‘apt-get’
In any case, it seems to working well.

One feature that I’m missing right now is the monitor night-shift/light capability.
I don’t seems to see this out of the box.
So this is on my to-do list as well.

Another thing that I missed also while typing this blog post is the ability to type emoji.
So I’m also trying to work out how to do this on Bodhi Linux.

Moving forward from here, I will be installing development tools to do some development work to determine Bodhi Linux’s suitability for some software development.

2021-09-03

Note on Github Actions

Filed under: cicd, computing, development, software — Tags: , — Zhixian @ 12:02:09 pm

Reminder: The yaml file for Github Actions can only be stored inside a ./github/workflows folder.

Github does not seems to look elsewhere or allow you to define a custom location.

I tried the following paths:

Works:

C:\project.github\workflows\my-actions.yml

Does not work:

C:\project\my-actions.yml
C:\project.github\my-actions.yml
C:\project\ci_cd\.github\workflows\my-actions.yml

Create a free website or blog at WordPress.com.