This is continuation of my previous blog post How to install Mono on Ubuntu.
This part focus on testing the installation to make sure that you have the minimal to compile C# source code and to run ASP.NET web applications.
Assumptions
- You have installed Apache HTTP Server
- You have followed the installation instructions in the previous blog post.
- You know how to create folder and files in Ubuntu.
- You know how to start a terminal session and run commands in it.
- You know how to navigate to other directories using terminal session.
Summary Steps
- Compiling and Running helloworld
- Create a Apache virtual host
Compiling and Running helloworld
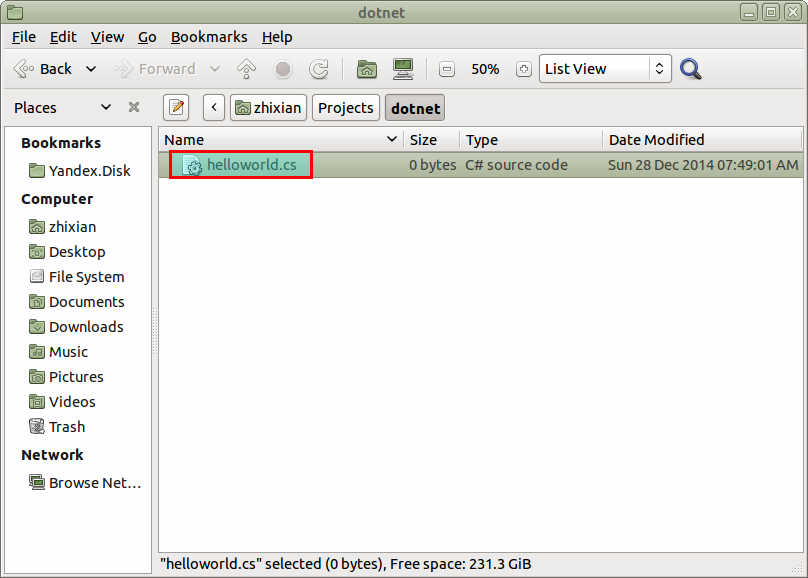
Create a folder to hold your source code. For example, I use “dotnet”.

Inside this folder, create a file call helloworld.cs.
Edit the contents of this file and replace it with the following:
// Hello1.cs
public class Hello1
{
   public static void Main()
   {
      System.Console.WriteLine("Hello, World!");
   }
}
After saving the file, start a new terminal session and navigate to the directory where you saved the file.

The command to run the compiler for C# in Mono is mcs. Compile helloworld.cs by entering the following at the command-line:
mcs helloworld.cs
After running this command, you should see that you have a file call helloworld.exe in your project directory.

To test run your application, enter the following command at the command-line.
./helloworld.exe

You should see the words “Hello, World!” after you run the command.
Create a Apache virtual host
Now that we are sure the compiler for C# works, we will test if mod_mono can run ASP.NET applications.
What we are going to do at this section is to create a virtual host on Apache to host our ASP.NET application.
Steps
- Define ASP.NET application
- Configure Apache virtual host
Define ASP.NET application
We are going to create our test application in this section.
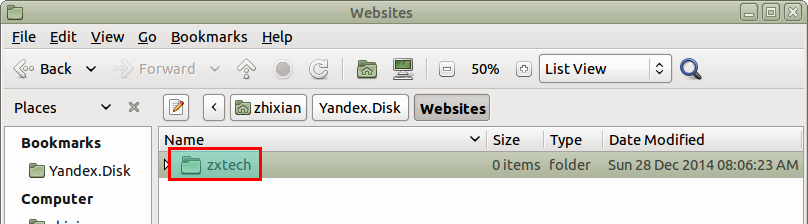
Create a folder to hold the contents of your ASP.NET web application.
In my case, I choose to put my file in a directory call zxtech.
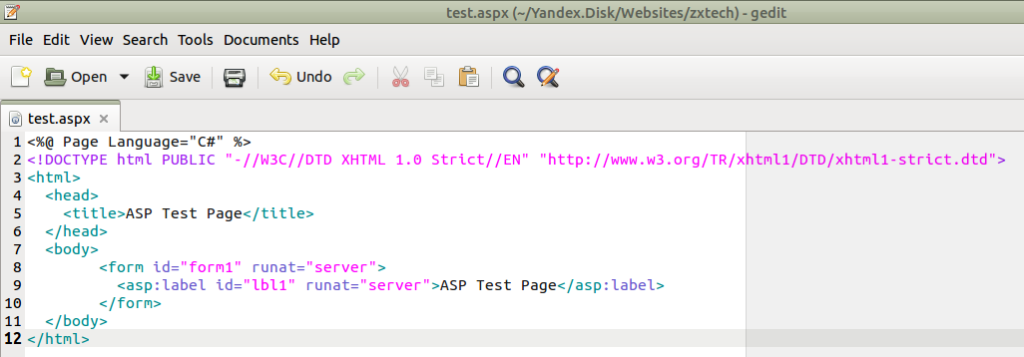
Inside this folder, create a file call test.aspx.

Edit test.aspx and replace the contents with the following:
<%@ Page Language="C#" %>
<!DOCTYPE html PUBLIC "-//W3C//DTD XHTML 1.0 Strict//EN" "http://www.w3.org/TR/xhtml1/DTD/xhtml1-strict.dtd">
<html>
  <head>
    <title>ASP Test Page</title>
  </head>
  <body>
        <form id="form1" runat="server">
          <asp:label id="lbl1" runat="server">ASP Test Page</asp:label>
        </form>
  </body>
</html>
Save the file.
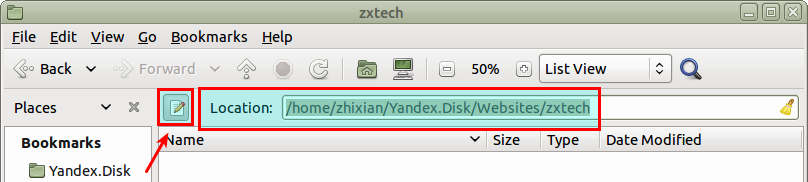
After saving the file, note the full path to the folder (press <CTRL>-L or press the button next to the Location buttons.)
You will need this information when configuring Apache virtual host.
Configure Apache virtual host
Ok. Here’s where things starts to get a little sticky.
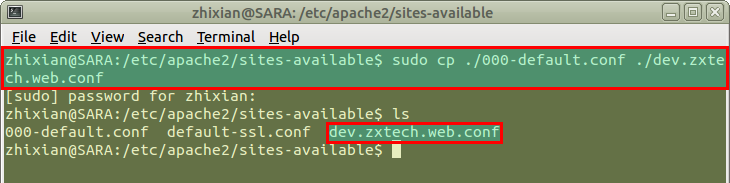
At your terminal session, navigate to Apache HTTP server’s sites directory (its /etc/apache2/sites-available/ by default) by entering the following command at the command-line:
cd /etc/apache2/sites-available/

By default, there should be 2 files in the folder, 000-default.conf and default-ssl.conf.
Make a copy of 000-default.conf for your virtual host (I am picking dev.zxtech.web as my virtual host name) by running the following command:
sudo cp ./000-default.conf ./dev.zxtech.web.conf
After the file is copied, edit the file.
Because the file is in folder owned by the superuser, you need to run the following command to edit the file:
gksudo gedit ./dev.zxtech.web.conf &

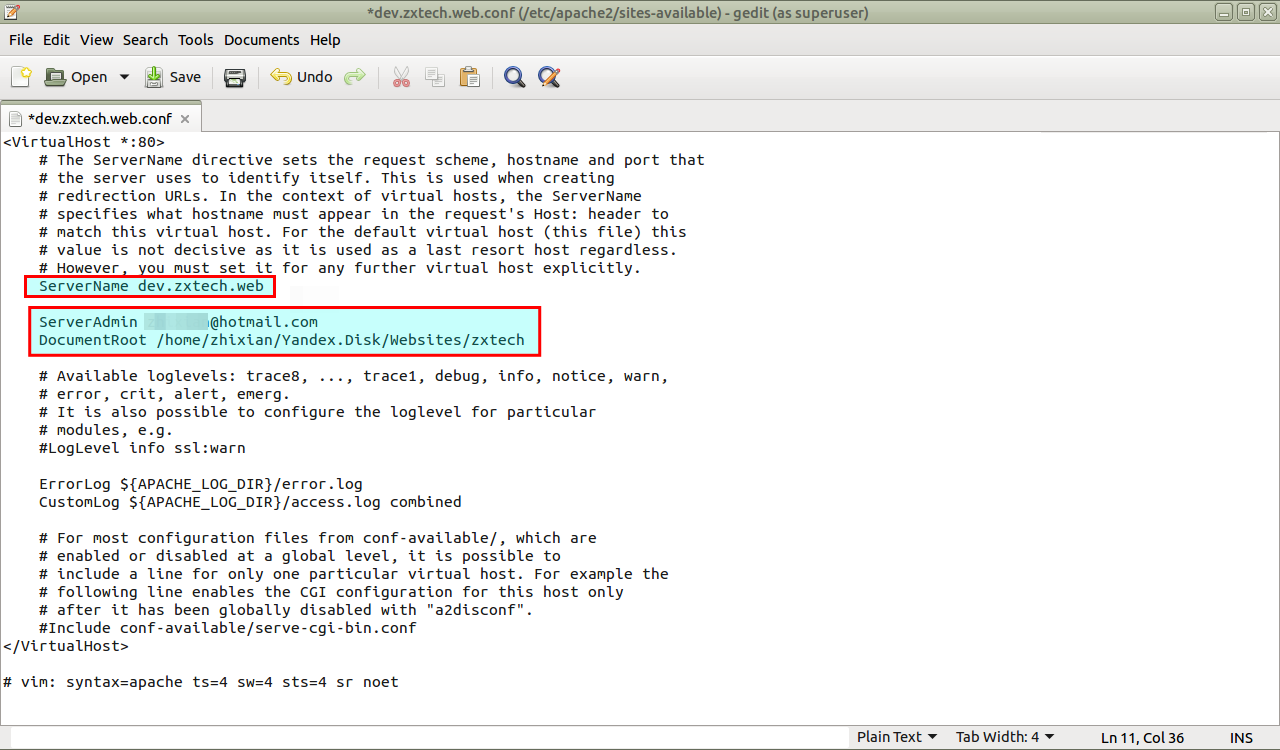
After you opened the file, you should see the following:

Things to edit on this file:
- ServerName
- ServerAdmin (optional)
- DocumentRoot (optional)
ServerName refers to the your virtual host name that you will be using. In the below screen shot, this will be dev.zxtech.web.
ServerAdmin refers to an e-mail address that will be used when people needs to contact the server administator.
DocumentRoot refers to the folder where you store your ASP.NET application files. This will be the location of the folder that that you have noted in the previous section. In the below screen shot, this will be /home/zhixian/Yandex.Disk/Websites/zxtech.
After update, the file should look something like the below.

Things to add on this file:
- DirectoryIndex
- MonoAutoApplication
- AddHandler
- MonoServerPath
- MonoDebug
- MonoSetEnv
- MonoApplications
- Apache directory configuration
- Apache location configuration
DirectoryIndex refers to the default documents that will be use if user navigate to the folder without specifying a specific filename.
MonoAutoApplication refers to using a scheme in mod_mono that allows accounts on a machine to deploy ASP.NET pages without requiring to do any configuration. I prefer to do manual configuration, and so am disabling it here.
AddHandler designates files with specified file extensions to be process by mod_mono.
MonoServerPath allows you to specify the version of Mono runtime to use.
In the below screen shot, we are using the latest mono-server 4 which is equivalent to using ASP.NET 4.0.
MonoSetEnv is use to set an environment variable for use with the Mono run time used to execute the web application.
In the screen shot below, I defined MONO_IOMAP.
MONO_IOMAP is defined to take care of case-sensitivity issues. You can read more about it here.
MonoApplications is use to tell mod_mono that the ASP.NET application exists at the root directory of the web site (/) and this root directory maps (:) to the folder /home/zhixian/Yandex.Disk/Websites/zxtech (hence “/:/home/zhixian/Yandex.Disk/Websites/zxtech”)
Aside from the above Mono configuration, you may need to add an Apache directory configuration section especially if you are are hosting the web application files outside of Apache’s default DocumentRoot location which is /var/www/
 <Directory /home/zhixian/Yandex.Disk/Websites/zxtech>
 Options Indexes FollowSymLinks
 AllowOverride None
 Require all granted
 </Directory>
You will also need to add an Apache location configuration section.
 <Location "/">
 Order allow,deny
 Allow from all
 MonoSetServerAlias dev.zxtech.web
 SetHandler mono
 SetOutputFilter DEFLATE
 SetEnvIfNoCase Request_URI "\.(?:gif|jpe?g|png)$" no-gzip dont-vary
 </Location>
 <IfModule mod_deflate.c>
 AddOutputFilterByType DEFLATE text/html text/plain text/xml text/javascript
 </IfModule>
After you added the sections, your configuration file should look like the below.

After defining the configuration file, you can enable the website.
sudo a2ensite dev.zxtech.web.conf

The last step to get our virtual name hosting working is to edit our hosts located at /etc/hosts

In your text editor, add a line
127.0.1.1 dev.zxtech.web

After this is done, you can navigate to http://dev.zxtech.web/test.aspx to test your sample web application.
You should see:

Reference
A nice tutorial to C# can be found here (http://msdn.microsoft.com/en-us/library/aa288463%28v=vs.71%29.aspx)


![rtk4.rar [read only]_005](https://ongzhixian.files.wordpress.com/2014/11/rtk4-rar-read-only_005.png)
